Lookup Table Window
This window is created by doing Window… New Lookup Editor (Ctrl-L).
Lookup windows which are specific to an ECU parameter file may also be launched automatically from the Calibration Editor. Such windows are not saved in the workspace and are closed automatically if the parameter files are reloaded.
Embedded systems often use lookup tables or “maps” as functions which map input values to output values. Interpolation is used to convert the grid of numeric values into a reasonably smooth function. For example, the ignition timing for an engine may be based on a two-dimensional array of values indexed by engine speed and engine temperature. OpenECU Calibrator provides a window in which such lookup tables can be conveniently displayed and edited.
Setting up a lookup table
A traditional automotive calibration tool reads a description file (e.g. ASAP2 .a2l) which describes the combination of arrays that are involved in one lookup table. OpenECU Calibrator does not need such a description file, but if you are not using one that means you have to set up a lookup table manually.
To work with lookups:
- A hardware channel must be active to work interactively.
- Ensure that symbols are loaded from the ECU linker file.
Automatic Setup from ASAP2 (.a2l) File
Your .a2l file should contain entries which define any lookup tables including references to the arrays which provide their X and/or Y breakpoints. Simply type the table name here and press enter, or click on the “…” button to browse:
![]()
The table should then be constructed automatically using the referenced breakpoint arrays:
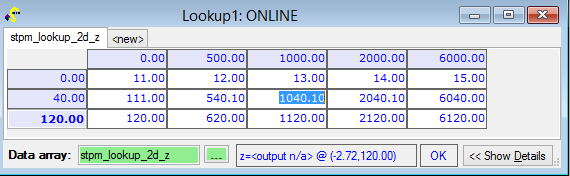
Manual Setup
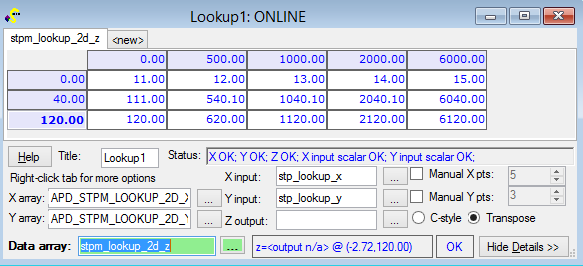
If you do not have an .a2l file, or it does not specify all of the variables required to set up your map correctly, you may manually specify all of the details. Click on the “<< Show Details" to reveal the necessary controls:
- Click the “…” buttons to browse for array and variable names.
- Alternatively names can be typed directly (or copied and pasted from your code editor).
- If the linker file provided information on the array dimensions, these are used to automatically determine the number of breakpoints. Otherwise you can set the size of the lookup table manually. CAUTION: if you specify a size larger than your array, then unrelated ECU memory data will be presented as lookup data and editing it will corrupt the data stored there.
- For a 1-dimensional lookup of the form z = f(x), specify the 1-D array of breakpoints as the X-array if you want the table presented horizontally or as the Y-array to display it vertically.
- For a 2-dimensional lookup of the form z = f(x,y), specify the X-array as the breakpoint values which index the columns and the Y-array for the values which index the rows.
- Typically in C language, a 2-D lookup table with 3 rows and 5 columns would be defined like this: my_array[3][5].
- Simulink uses data transposed from the C convention (my_array[5][3]). This is the convention OpenECU’s OpenECU uses to be compatible with Simulink. Select “Transpose”if your data is arranged this way round.
- If the number of X and Y breakpoints are unequal, OpenECU Calibrator sets the layout to C-style or Transpose automatically if it can obtain the array sizes from the linker file. You must set it manually if the 2-D array is symmetric however.
- The default layout for symmetric 2D lookups can be set under File… Preferences.
Specifying operating point variables
Optionally, you may specify the scalar variables in ECU memory which contain the value(s) being used as inputs to the lookup, and the value obtained as its output. If so, OpenECU Calibrator displays their current values as the current operating point, and highlights the currently relevant breakpoints and portion of the table:
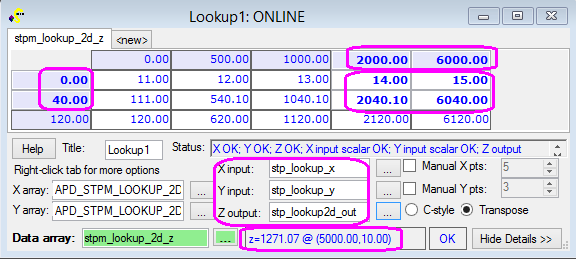
Note that the output variable is not defined in the ASAP2 (.a2l) file. The input variables may be filled in automatically from that file, however.
Screen space
When you have finished configuring a lookup, click the “<< Hide Details" button to give more space for map editing:
To save screen space, you can open different lookups as tabs within one lookup window, though you may also use multiple lookup windows.
Copying, pasting and reverting
Right click on the map to see additional operations. These include:
- Map data can be copied via the Windows clipboard to an outside editor like Microsoft Excel and back again. Do Ctrl-Shift-C to copy the entire map including breakpoints.
- Map data can be pasted back in using Ctrl-V. If the pasted data includes breakpoints, they will be included.
- Revert the current selection to file-loaded (base calibration) values using Ctrl-F.
- Revert the whole map using Ctrl-Shift-F.
Note: see also Revert calibrations and Download-synchronise ECU operation.
Value display
See Understanding Memory to understand the colour coding of values (live, file or edited).
If live values are not shown, check that the hardware interface for the ECU is Activated (try Deactivate and Reactivate if necessary).
Editing
- To change a single value, click on it, type a new value, and press Enter.
- To change a block of values, drag across them with the mouse. The last cell will be left highlighted. Type in a new value, and press Enter. That value will be applied to all selected cells.
Controls Toolbar
You can also nudge values by using the buttons on the controls toolbar. (Windows… Controls Toolbar to display it if it is not currently shown.) This toolbar may be dragged near the window you are working with:

Interpolation
To quickly set up an evenly-spaced line or grid of values, first set the ‘end’or ‘corner’ values. Then drag across the range with the mouse, and do right-click… Interpolate Selection.
For example, here the entire X breakpoint range is selected with end values of 0 and 10000, and the middle value is currently 3000:

After interpolation, the breakpoint values have been set to even-spaced values between 0 and 10000, and the middle value is now 5000:

Similarly a two-dimensional range of cells can be selected by dragging the mouse across them. Here the values are all zero except the “corner”values before interpolation:

After interpolation, the values are set linearly between the corner values, taking account of the breakpoint values:

 Accessibility