
![]()
Application Note: Using OpenECU Calibrator with OpenECU
General OpenECU support: openecu@openecu.com
OpenECU website: openecu.com
OpenECU Calibrator enquiries: openecu@openecu.com
OpenECU Calibrator website: https://openecu.com
Contents
Introduction and Scope
… Terms and Abbreviations
… References
Installation and Licence
Hardware Configuration
Working with Calibrations and Variables
… Loading Symbols and Default Values
… Variable Value Logging
… Nonsense Variable Values?
… Offline Calibration
… … Managing Offline Calibration Values
… Saving calibrations as an image file
… Saving calibrations as a parameter file
… Programming the altered calibrations into the ECU
… … Instant Commit to Flash
… … Flashing Calibrations using File(s)
… … After Calibration Flash Reprogramming
Introduction and Scope
This document is a guide on getting started using the OpenECU Calibrator CAN-based debug/calibration tool with OpenECU’s OpenECU product.
This document is included in the general OpenECU Calibrator online HTML help, but may also be available as a standalone application note. Links in this document to other OpenECU Calibrator help pages will work only in the online help version.
OpenECU Calibrator is a tool for developing, debugging and testing ECU software, providing an ideal partner to OpenECU.
OpenECU Calibrator provides the immediate low-level access to variables and memory typical of a debugger, but communicates via CAN to an ECU operating in real time, in the same way as a calibration tool. It therefore provides a powerful means of rapidly testing and experimenting with software operating in a live environment such as a vehicle or bench set-up.
OpenECU Calibrator is optimised for software engineers to develop and test programs, but also provides a cost-effective means of adapting calibration values in most projects.
OpenECU Calibrator can read the linker description file for the software build directly, giving access to all parameters including data structures, arrays, and pointers, and both constants and RAM variables. It does not require data descriptions or an ASAP2 file (but this can be read if desired), and no rebuild of software is required to make additional parameters accessible to the tool. All parameters and variables can be modified (if allowed by the ECU) in debugger-style watch windows.
Note: in Simulink builds, this means Real-Time Workshop structures such as rtDWork and rtB can be explored, making “hidden” block-related values, seen in the autocode, available for debug purposes.
OpenECU Calibrator’s features include flash reprogramming, data logging, diagnostic message exchanges via J1939 or UDS/KWP/J1979, CAN traffic generation and logging with DBC file support, and ASAP3 control.
This document concentrates on the OpenECU-specifics of working with applications, calibrations and variables. For other OpenECU Calibrator functions, see the general OpenECU Calibrator help.
Terms and Abbreviations
| ASAP2 | Standard for .a2l format data description (parameters, types, units, ranges) |
| CCP | CAN Calibration Protocol standard from www.asam.net |
References
- OpenECU user guides> (Start… Programs… OpenECU Developer Software… [version]… Documentation… User Guide… [PDF/HTML and Simulink/C-API versions]
Installation and Licence
Note: you may need administrator privileges for the installation process.
Download OpenECU Calibrator from the OpenECU website. Follow the demo download link from:
https://openecu.com (registration required to download the installation package)
Run the OpenECU Calibrator installation program (.msi file) to install the program on your PC.
OpenECU Calibrator will install by default to a program directory of C:\Program Files on 32-bit versions of Windows or C:\Program Files (x86) on 64-bit versions (or the equivalent in other languages).
A basic licence file is included automatically (snoop_licence_demo.txt). This allows all features to be tried, but has various limits on all operations.
For full operation, obtain a full (purchased) or time-limited trial licence file from OpenECU. This will be called snoop_licence.txt. Copy it to the program directory, and it will be found by OpenECU Calibrator the next time it runs.
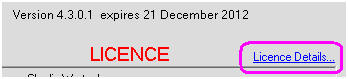
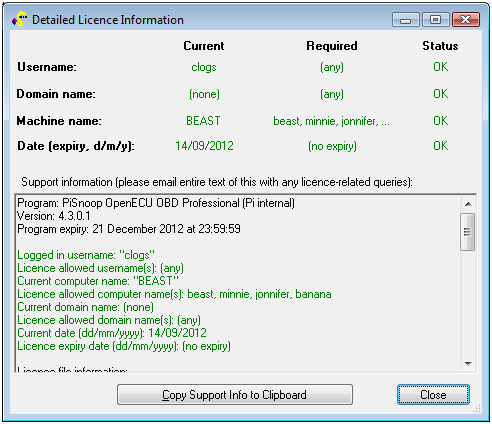
For details of the licence file currently in use, and to troubleshoot any licence issues, click on this link on the splash screen (which can be called up later by doing Help… About):
Hardware Configuration
OpenECU Calibrator currently supports Vector, Kvaser and PEAK-System CAN interfaces as primary options. (Some ETAS interfaces also work using the Vector option.)
Experimental support is also provided for USB “virtual COM port” CAN interfaces ranging from USBtin (fairly usable) to Lawicel/USBCAN (light bus load OK) and EasySync (only works with very light bus load, produces incorrect receive IDs and/or just stops working at higher load). All of those devices have some issues, e.g. may require USB unplugging and reinsertion to clear errors. Some CCP timeouts will be seen with any of those devices due to their slower operation and bandwith limitations.
You must have Windows device drivers for your hardware installed (from the manufacturer website) before using OpenECU Calibrator, but the OpenECU Calibrator installation includes the application interface DLLs for all supported hardware.
Do File… New Hardware Comms Channel to define a hardware interface:
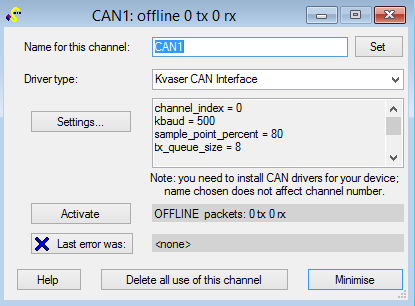
By default the first channel defined is called CAN1, but this is just a name, which you can change. It does not relate to the hardware channel in use.
Click on Settings… to alter parameters such as which specific hardware channel you wish to use and the baud rate for your ECU (typically 500 or 250 kbit/s).
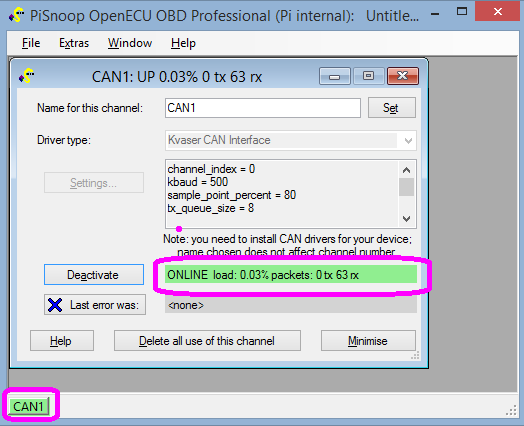
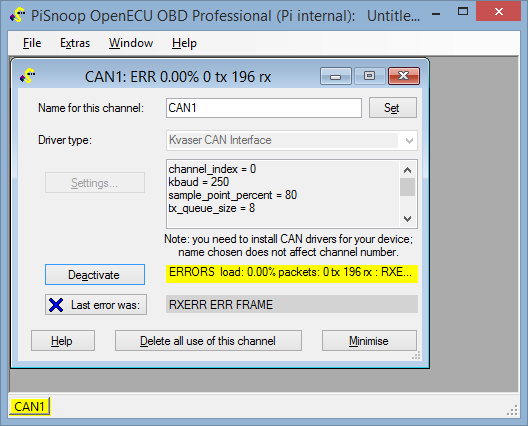
Click Activate to enable the channel. If successful, the indicator will turn green, and a small indicator in the status bar will also turn green:
If the wrong baud rate is selected, no other device (e.g. ECU) is present on the bus, or a terminating resistor is not present, errors may be flagged, e.g.:
A serious error (e.g. no hardware interface connected to PC) gives a red indication:
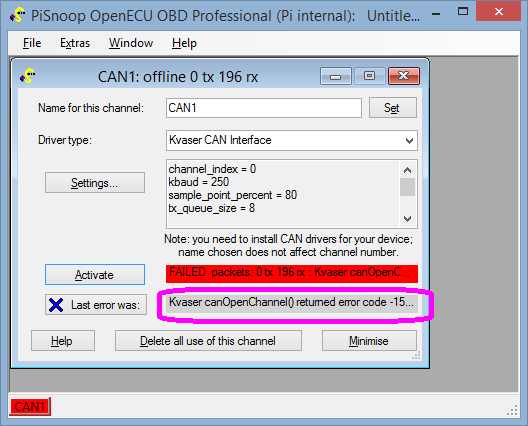
(Hover over the error text to see the complete message.) Correct the problem and if necessary click Deactivate and then Activate to try again. This cycle clears the use of the hardware driver and re-initialises it.
You many minimise the hardware window once it is set up to save screen space. However, if completely closed, the channel is deleted.
Working with Calibrations and Variables
OpenECU uses a separate calibration area of flash memory for storing calibration parameter values, intended for adjustment and adaptation. This is separate from the code area of flash. Most OpenECUs place calibrations in the area 0x40000 to 0x7FFFF at the time of writing, but some older targets use different address ranges. By default, OpenECU Calibrator detects the correct address range automatically when loading symbols from an .a2l or .elf file.
Most OpenECU targets have external SRAM. When the ECU is powered up, all of the calibration values are copied from the calibration area of flash to SRAM, and then the microcontroller memory is reconfigured so that further accesses to the calibration area are directed to SRAM. This means it is possible to change the values while the ECU is running (“calibration on the fly”). Therefore calibration parameters can be modified in OpenECU Calibrator just like RAM variables using Watch, Memory and Lookup windows.
There is also a specific Calibration Editor window which allows you to compare and combine calibration values from different files.
Each time you change a value, OpenECU Calibrator uses download commands to request that the ECU alters the memory values immediately. However, the values are lost if the ECU is depowered. To make the value changes permanent, the calibrations must be programmed into flash memory.
Some OpenECU targets, intended for production use, do not have external SRAM, to save cost. Calibration on the fly is not possible for these targets, because their calibrations are stored only in flash, which is read-only unless a flash reprogramming operation is performed. However, it is still possible to modify calibration values offline in OpenECU Calibrator and then reflash the calibration area with the new values. See Offline Calibration below.
Loading Symbols and Default Values
To adapt calibration values, you will usually need:
-
symbol file (.a2l or .elf), so that the names and addresses of parameters in the current build are known; you may load both an .a2l file (with parameters defined in data dictionaries) and an .elf file (containing all symbols, but without descriptions and ranges) simultaneously if desired. It does not matter which variety of .a2l file you use (_generic, _inca, _ati, _canape) from the OpenECU build.
-
An image file (.s37 or .hex), which has the actual default data values which are normally loaded into flash memory. You can work with the “small” image file which contains both code and calibrations. If available however, only the “_cal”image file is actually required, and this is much smaller and quicker to flash to the ECU subsequently if the ECU already contains compatible code from precisely the same build of software.
Note: the image file is not required if you are working online with variables and do not need to see or upload changes from the original build values for calibrations.
The quickest way to add files to an ECU is to drag and drop them from Windows Explorer into OpenECU Calibrator. Alternatively, use the “Add existing…” button in the ECU window. Here the .a2l and .hex files have been loaded and the workspace saved in the same directory, so the relative file paths displayed are reduced to just the filenames:
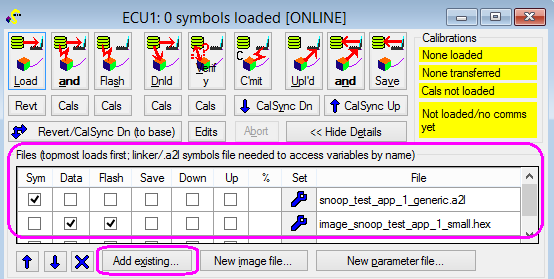
(It does not matter which variant of the OpenECU .a2l file you use, and both .hex and .s37 format image files can be used.)
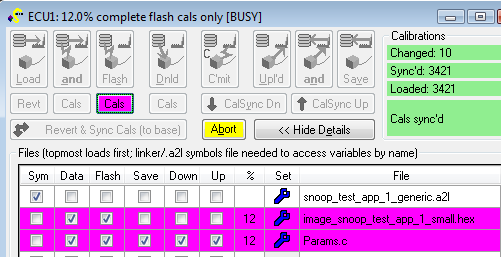
Click “Load” to load the symbols and data into PC memory in OpenECU Calibrator. While loading, the “Load” button is highlighted, and the percentage progress shown for each file and for the overall operation, which is typical during OpenECU Calibrator operations:

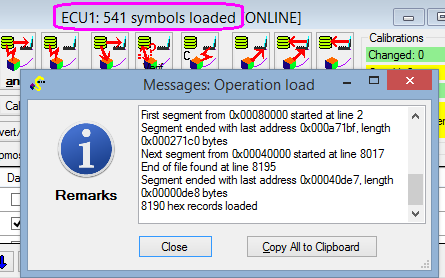
Once loading has completed, a message will appear, and the ECU window should indicate that symbols (parameter names and addresses) have been loaded:
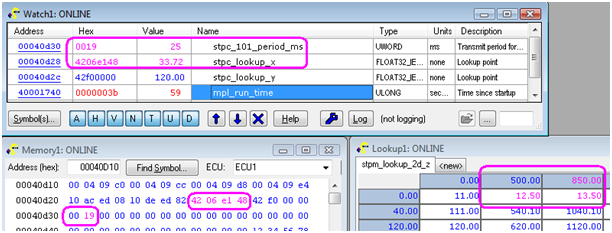
You may now use Watch, Lookup and (with caution) Memory windows to edit the PC memory contents. Values which you have altered compared to the original values loaded from the .s37/.hex file are highlighted in colour:
-
pale brown: offline value loaded from file (base value)
-
green: offline value uploaded or edited in PC memory (same as base value, or no base value)
-
purple: offline value which differs from file-loaded (base) value
-
grey/question marks: unavailable (e.g. RAM measurement value not yet uploaded, when offline)
-
blue: online value continually refreshed from ECU
-
pink: online value from ECU which differs from loaded value in PC memory
For example, here the ECU is online, so most values are blue (live) or red (just changed). However, values that have been edited are pink (live, but value changed from the PC memory value loaded from the image file). Note that user-altered RAM variable values are never highlighted in pink, because they have no default values loaded from the image file.
Variable Value Logging
OpenECU Calibrator .CSV-format logfiles can be created either by saving data which has accumulated in the oscilloscope view (though old data is eventually discarded), or by starting a logfile. Old logfiles can be re-opened in a Watch/Scope window, or opened in an external program such as Microsoft Excel.
The scope view is shown below. See the main Watch window help for more details.
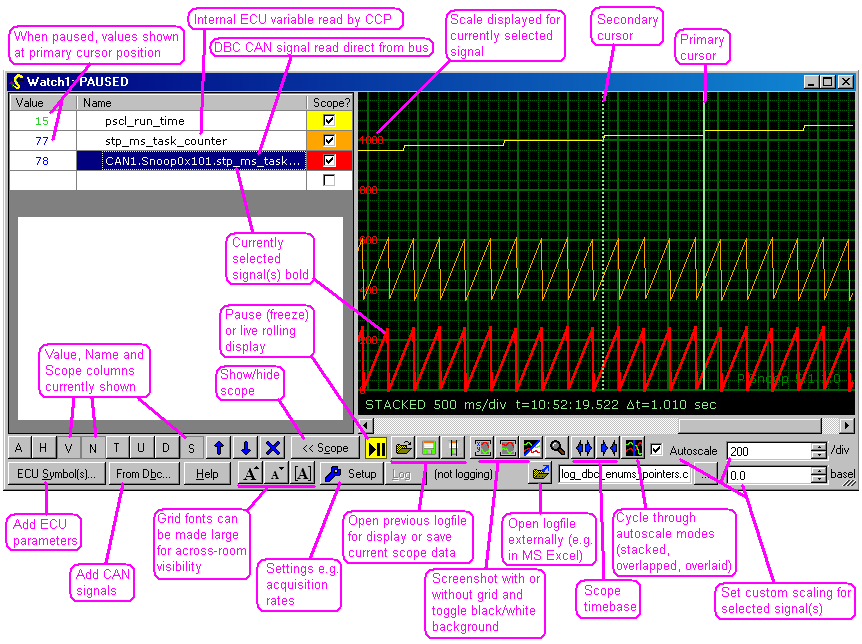
Click the spanner (wrench) icon to adjust logging settings. By default CCP DAQ is used to speed up data transfers when available, as it is for OpenECU, and currently 5 ms is the fastest supported rate for OpenECU targets. Click the ‘Log’ button to start logging.
If the ECU power is cycled during logging, data acquisition is automatically resumed when the ECU starts responding again. To log startup behaviour as fast as possible, choose a 5 ms rate and the ‘Sparse’ format option, and begin logging before you turn on the ECU.
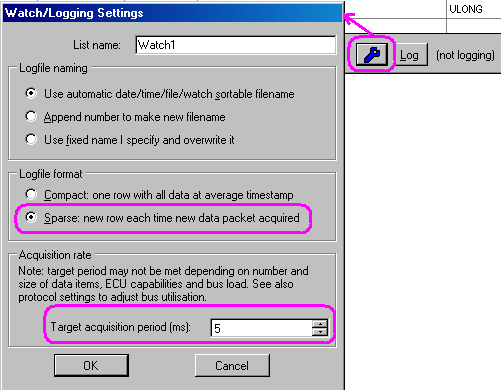
Note: you may get a few extra datapoints by setting an even smaller target period (e.g. 1 ms), but these will be one-off uploads and not synchronised CCP-DAQ.
Nonsense Variable Values?
Both calibration parameters and RAM values will, in general, occupy different memory addresses in different software builds. If the software running is a different build to the one you have symbols loaded from (.a2l or .elf), values will appear non-sensical. To avoid this, always load symbols from precisely the build that is running in the ECU. The ‘Load and Flash’ button makes it easy to ensure that loaded symbols match the current build of software flashed into the ECU.
Warning: if you alter values when the wrong symbols are loaded, the effect on the ECU software is completely unpredicatable and it may well crash or exhibit other unexpected behaviour.
Although OpenECU does not currently support CCP-DAQ in reprogramming mode, it does support CCP uploads. Therefore OpenECU Calibrator will continue to display live values if the ECU is in reprogramming mode because FEPS has been applied or if the application is invalid, etc (see the OpenECU user guide for details of flash codes which indicate when the ECU is in this mode and for what reason).
Calibration values will appear normal in reprogramming mode, but cannot be altered as they are not ‘shadowed’ into external SRAM. An error will be reported if you try to change them.
However, the boot loader has its own variables which occupy the same RAM space as the application variables uses when it is running. Therefore if you have application symbols loaded when the boot loader is running, the variable values will generally appear non-sensical. This is a similar situation to having the wrong application symbols loaded, and can be a clue that your ECU is in reprogramming mode unexpectedly (for example, if you have forgotten to cycle the ECU power after flash reprogramming).
Note: for OpenECU developers, it is of course possible to load the boot loader symbols to view the relevant variables correctly in reprogramming mode.
Offline Calibration
It is possible to adapt calibration values offline if no ECU is available, or if the ECU in use does not support “shadowing” of calibration parameters in RAM for on-the-fly value changes.
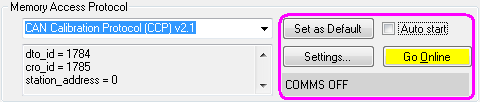
To work offline, create an ECU window if you do not already have one (File… New ECU) and then click Go Offline in the Memory Access Protocol section. Also uncheck “Auto Start” if you will regularly be working offline. (In this picture, no hardware channel is defined for ECU communications in any case, as no ECU is required at this stage.)
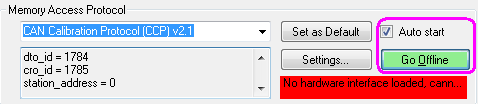
Once communications are turned off, the display will look like this:
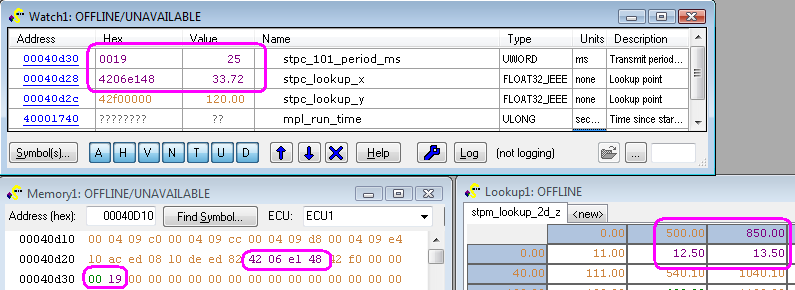
Now OpenECU Calibrator will work only with offline data in PC memory, and not attempt to upload or download data to an ECU. The calibration values loaded from the image file will be displayed in brown, and edited values differing from base values in purple:
Managing Offline Calibration Values
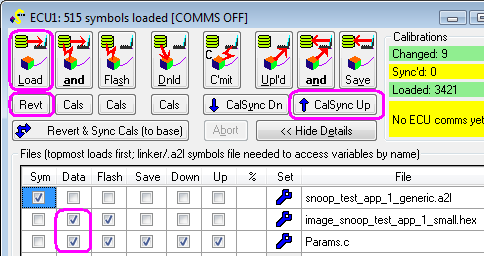
Even with automatic memory access (live Watch updates) turned off, you can use the CalSync Up button to transfer all current calibration values from the ECU to the PC scratchpad memory. Use this if your ECU already contains a good calibration which you wish to make some modifications to.
Alternatively, you may have previous calibration edits saved as a parameter file, which can be loaded at the same time (or independently of) the base calibration from the .hex/.s37 image file. While the base values are loaded as “file” data, the parameters are loaded as “scratchpad” data, so that differences can be displayed and retained if the parameter file is re-saved after further edits. See also Saving calibrations as a parameter file below.
Finally, the Rev’t (revert) button discards all calibration edit values from PC scratchpad memory and reverts to the base values loaded from the .hex/.s37 file.
For more detail on these controls, see the ECU help page. These particular options are highlighted below:
Saving calibrations as an image file
Note: this method is documented for completeness, but has the disadvantage that it only works for the current build (see below for saving as a parameter file which is portable between different builds of software).
Your altered calibration values can be simply saved back to the .s37/.hex file, so that if the file is later used for flash reprogramming, the ECU will get the edited values.
Warning: if program code bytes in the image file are edited, the program checksum will fail and/or the program will crash if run, with unpredictable results.
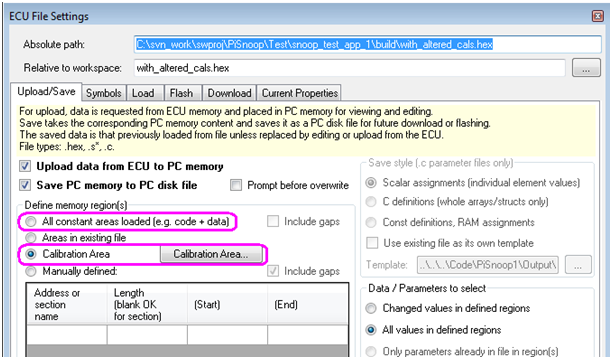
Alternatively a new .s37/.hex file can be created with your modified calibrations as follows:

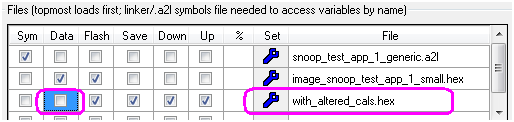
This can cover just the calibration parameter area of memory (for faster reprogramming, where the ECU already has code from exactly the same build), or the whole calibration + code area. The file properties are displayed automatically when you create a file; otherwise click on the spanner (wrench) icon.
Here ‘Data’ has been unchecked so that if the ECU is connected, the altered values will show up as modified compared to values loaded into PC memory. But if you wish to make offline edits in future, ‘Data’ should be checked so that the modified values are loaded into PC memory.
To actually save the modified image file, click ‘Save‘ if you are working offline (just saves PC memory to disk):
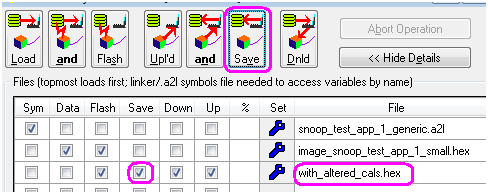
But if you are working online with an ECU, use the ‘Upload and Save’ button to ensure the latest values in ECU memory are first transferred to PC memory, and then saved to disk.
Saving calibrations as a parameter file
Each time you rebuild software, you should assume in general that parameter addresses will change. So if you wish to reuse the altered calibration values with a different build in future, those values must be stored by parameter name and not as a memory image.
Currently OpenECU Calibrator stores parameters in these formats:
- A custom C file format. This allows the possibility that C code programs can actually have their source code value definitions updated.
- MATLAB M-file format*. This allows altered calibrations to be read into the MATLAB workspace to use in Simulink simulation.
- DCM format*. This is portable to some other calibration tools.
Note: currently OpenECU generates .a2l file entry names such as APD_STPM_LOOKUP_2D_X for an axis array called stpm_lookup_2d_x in the model. When saving in M-file format, the model-compatible name is used automatically.
*Ultimate variant required for these calibration file formats.
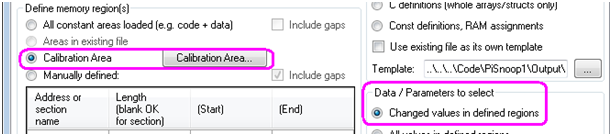
Do ‘New parameter file…’ to create such a file:
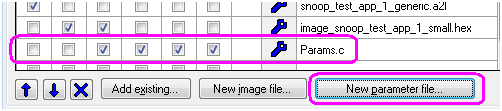
By default the file will be configured to save only value changes compared to what was loaded from file in PC memory. This means that only those parameters you have actually edited will be used in future. Any other values defined in later builds will be left with their default values:
Again click ‘Save‘ to create the file if working offline, or ‘Upload and Save’ if working online with an ECU. You should find that the parameter file contains C-style statements which set up the values you have altered (you may drag and drop the file directly from OpenECU Calibrator to an editor):
      void init_params(void)

      {

            /* SNOOP_CONST_PARAM_ASSIGNMENTS_BELOW */

            APD_STPM_LOOKUP_2D_X[2] =     850.00;

            stpm_lookup_2d_z[1][0] =      12.50;

            stpm_lookup_2d_z[2][0] =      13.50;

            stpc_lookup_x =      33.72;

            stpc_101_period_ms =         25;

            /* SNOOP_CONST_PARAM_ASSIGNMENTS_ABOVE */
Programming the altered calibrations into the ECU
Instant Commit to Flash
If you are happy that the PC has all of the calibration values you require (e.g. loaded from file or uploaded from ECU, and then possibly edited), the fastest way to flash the ECU with the altered values is to use the Commit button:

Flashing Calibrations using File(s)
If flashing with a parameter (.c) file, you must also flash with an image file (.hex or .s37) covering the whole calibration area, so that values are defined for all memory locations used by your application. The parameter file values are then “superimposed” on top of the image file, if loaded in that order, so the values flashed to the ECU will be the parameter file values where defined, or the image file values otherwise. You may not flash with only a parameter file, because that would leave “gaps” of undefined values for all of the other memory locations, because the whole flash block is cleared to 0xFF values during the flash erase process.
If you have rebuilt software since you last flashed the ECU, you must reflash with the complete code + calibration image file (e.g. model_small.s37) so that the code and calibration locations are consistent, using the ‘Flash‘ or ‘Load and Flash’ button.
But if your ECU already has the current code flashed, you can use the ‘Cals‘ button underneath to flash only the calibration area, which is much faster, leaving the ECU code area untouched.
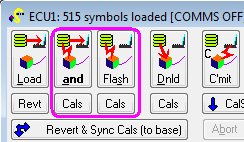
In the picture below, symbols were already loaded and up to date, and the ECU code already matched the current build, so using just the ‘Flash Cals‘ button is fine (and fast). If symbols were not previously loaded, or if a new build had been made since they were last loaded, the ‘Load and Flash’or ‘Load and Flash Cals‘ button should be used instead so that symbols are reloaded, in case any parameters have changed address or type since the last build.
After Calibration Flash Reprogramming
After flash reprogramming has completed and the ECU power is cycled, the online values show the calibration values previously edited are now permanently resident in ECU flash (highlighted in pink here because they differ from the loaded .hex file, which still contains the default build values):
Keeping Calibrations Synchronised with the ECU
By default, OpenECU Calibrator continually uploads values in Watch and Lookup windows when online. It also allows Watch window logging and oscilloscope display to continue as soon as possible if the ECU resets or goes through a power cycle. This is best for uninterrupted debugging and for observing startup behaviour, when variable value changes within tens or hundreds of milliseconds after startup may be important.
However, during calibration work, this means that edited calibration values are “lost” if the ECU resets, because the post-reset ECU value will be automatically uploaded, overwriting any value you have displayed on screen. If your edits are saved in a parameter file, you can use the “Download calibrations” button manually to restore them.
But instead, you can choose to have the ECU calibration resynchronised with the PC automatically on reset.
Note: this only works with protocols that support the concept of a session such as CCP. It is not available with UDS or S3P for example.
To do this, bring up the Resync Options by clicking this button in the ECU window:

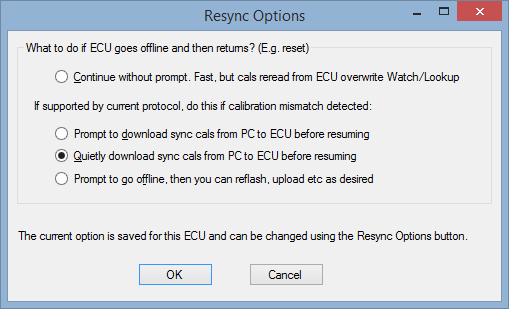
Choosing the “Quietly download sync cals” option pictured causes OpenECU Calibrator to do the following when a reset or power cycle is detected:
- First, go offline, so that no post-reset calibration values from the ECU overwrite the current values in Watch or Lookup windows.
- Verify whether the ECU calibration area memory contents match the PC scratchpad memory (loaded values plus edits).
- If necessary, perform a “calsync down” download operation, to restore the ECU calibration values to the current PC values.
- Finally, go back online.
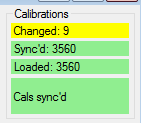
The result of this process is that within a short time of any reset, the ECU calibration is restored to the values you have been working with in OpenECU Calibrator. This is indicated in the ECU window:
But remember this resync process takes some time, so it should be turned off if you wish to observe fast ECU startup behaviour. Note also that the download of calibrations to the ECU is not instantaneous, and before it completes, the ECU will be using its post-reset values (e.g. base values).
For more detail on the other options see Calibration Help.
Comparing and Merging Calibration Parameter Files
The Calibration Editor allows you to display the base, ECU and paramter file values of calibrations side by side, edit them, highlight differences, and drag values from one to another.
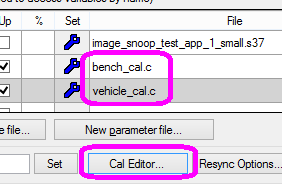
It is launched from the ECU Window by clicking the “Cal Editor…” button:
The Calibration Editor then appears listing the values for all parameters in the calibration area of memory:
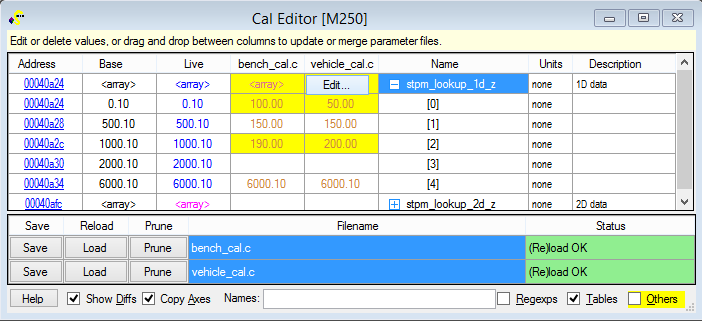
See Calibration Editor Help for more.
Return to Getting Started (in OpenECU Calibrator online help only)
 Accessibility